Wondering how you ended up here?
Well, most likely one of your friends got into the cryptocurrency world, and started raving about the coin that they purchased, convinced you that you can make a lot of money if you buy XRP at 10¢/coin and sell it at $18,000 in a year!
Sure, great! You’ve come to the right place, this guide will help you grasp the bits and pieces involved in holding different currencies, and how to trade them.
Disclaimer: I’m not a pro in any way, I’m not giving you advice on what to buy/sell, or why you should do things the way I’ve described them here. I decided to write this guide mainly because I’m getting daily messages on how to trade in crypto, so I thought this might help.
Step 1: Setting up your account with an exchange
An exchange is like a broker account/interface to allow you to buy/sell cryptocurrency for fiat money. In order to do that, you’ll need to create an account with an exchange of your choice, verify your identity, link your bank account, and fund that newly created cryptocurrency account.
The most popular ones are Coinbase (www.coinbase.com), and gdax(www.gdax.com), which is owned by the same company.
- At the time of this writing, those only allow you to trade the following coins: Bitcoin (BTC), Bitcoin Cash (BCH), Ethereum (ETH) and Litecoin (LTH).
- Click this referral link, which will grant you $10 in BTC when you transfer $100 into the account: https://www.coinbase.com/join/5a037ff583d330012647acfb
- Keep in mind that the referral bonus you get in BTC will most likely appreciate in value, and one day that $10 could be worth $100 or more ????
Step 2: Verifying and funding your exchange account
- Make sure to follow the steps to verify your account (upload ID image, SSN…), all the good stuffs.
- Link your bank account, and initiate a transfer to the exchange (Coinbase). Keep in mind that the transfer could take up to 7–10 business days.
- While you’re waiting, you can start browsing around to find what other coins might be interesting to you. This link contains all the cryptocurrencies sorted by market cap: https://coinmarketcap.com/
Step 3: Understanding wallets
Something you need to become familiar with in crypto is the term “wallet”. A wallet is a combination of a private and a public key, which holds your coins. Think of it as an account number, that is really long, with no username/password. Anyone with your private key, can claim the coins in your wallet. So make sure not to share it with anyone!
Different types of wallets:
- Online Wallet (most popular): It’s basically coinbase/gdax, or other exchanges, where they store your wallet on their servers. And they only have access to your private keys.
- Local Wallet: It’s a software/app that you install on your machine to store your coins in. This is my preferred way of storing the coins that I hold, just in case the exchange gets hacked or anything, if they don’t offer any insurance, then you will be better off having your coins on your computer.
- Cold Storage / Paper Trail Wallet: People refer to this as the most secure way, as you will only have your keys written down on a piece of paper, the only thing is that you can’t really transact with them, you can only receive coins knowing your public key. But not sending, or converting to fiat money.
- Hardware Wallet: It’s an encrypted USB thumb drive, which runs a software, and allows sending coins directly from it. You’ll of course need to plug it into a computer, authenticate either with a fingerprint ID, or passcode. More details here.
Knowing your public wallet key, means that anyone can transfer coins to that public address, and you’ll receive them within a short amount of time (for the most part).
I usually go with Online Wallet on Coinbase/Gdax + Local Wallet (more details in the sections to follow).
Step 4: Money transfer complete, now what?
Now that you have your exchange account setup, money in the account ready to be spent, you got a couple of options here, if you wanna buy BTC, BCH, ETH or LTC, it’s super easy, just place the order on the exchange, by specifying the amount of money you’re willing to spend, and they will show you how many coins you’ll be buying.
Selling is also easy and similar, just specify how many coins you’d like to sell, and poof!
Unlike stocks, with cryptocurrency, you can usually hold less than 1 coin, so you can have 0.0001 BTC, etc. (Except for a couple of other coins like NEO, where you’re only allowed to hold full integers).
Step 5: Holding coins other than BTC/BCH/ETH/LTC
You’ll come to realize very quickly, that you’d want to own assets other than those three most popular ones. (perhaps Ripple/XRP, EOS, Neo, etc…?)
And wondering, how am I gonna buy those if Coinbase doesn’t support them? (Kraken.com allows you to buy XRP and a few other ones, but nah, why bother with verifications and all the drama again.)
The solution is to use a service which allows you to convert coins from a currency to another. So you can convert BTC to XRP, or ETH to EOS, etc.
The most popular ones are www.shapeshift.io and www.changelly.com
When wanting to specifically just buy XRP for example, you’re better off buying LTC at market price, and directly initiate a conversion onto one of those services.
That way you’ll make sure to convert as close to the fiat money you’re willing to invest in XRP. (Otherwise you could have bought a LTC a few days ago with a price different from how much it’s selling for today).
Step 6: Using shapeshift to trade
After heading to shapeshift.io, pick the From/Deposit and To/Receive currencies. I picked Litecoin → Ripple as an example:
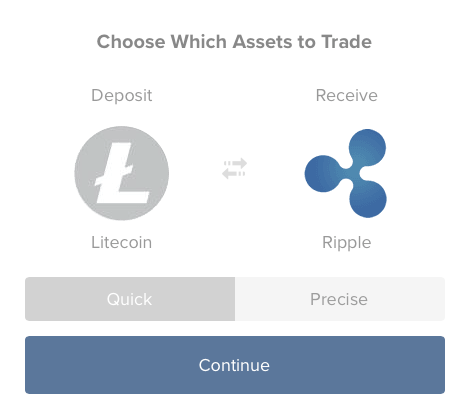
This means you’re about to convert some Litecoin that you own into Ripples.
With the “Quick” option selected, hit continue, which will present you with the following screen:
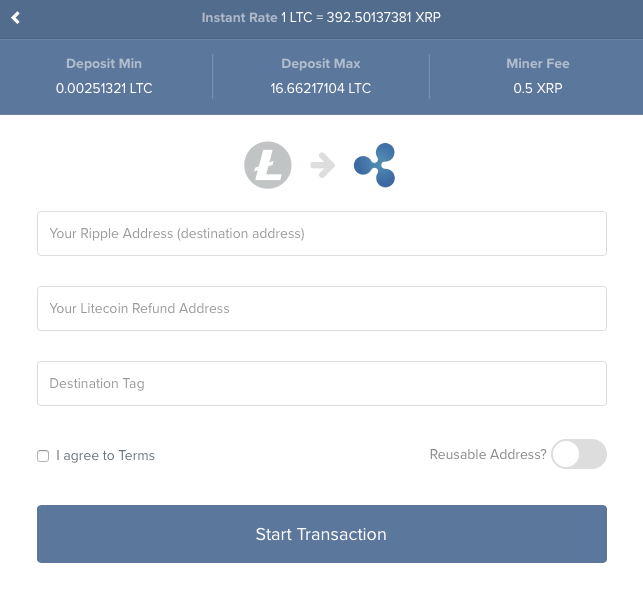
Note the conversion rate at the top, you’ll need to do the math to figure out the price per asset you’re acquiring.
Now you’re wondering what is my Ripple address???
That’s when you need to install a “Local Wallet” on your computer! Yay!????
- Download this Ripple/XRP wallet called Rippex: https://rippex.net/carteira-ripple.php#/
- After installing it, it’ll ask you to enter a password, print your private key, etc. Do everything they say. Then you’ll see a screen, showing your public key at the top/right with a green dot next to it.
- Now you’re ready to receive your XRP. Copy the public address and paste it in the first field in shapeshift.io
- Now for the Litecoin Refund Address: go to coinbase or gdax, and navigate to your LTC wallet and click on something that says: “Receive” or “Deposit”.
- A QR code with your public litecoin address will appear. Copy that one and paste it in the second box in shapeshift.io (Don’t worry about the Destination Tag if you’re receiving XRP to your ripple account.)
- Click the “I agree checkbox” and hit Start Transaction (ignore the Reusable Address option).
- You’ll be presented with a new LTC address, which is shapeshift’s “Receive” LTC address, to send the number of LTC you wanna transfer out of your coinbase/gdax. That way they can take them from you and give you XRP instead. (Same concept as exchanging USD to EUR).
- Go on Coinbase/gdax and click “Send” or “Withdraw”, and it‘ll ask you for the LTC destination address. Paste the public key that shapeshift.io gave you for their LTC wallet.
- Enter the amount of LTC to transfer, and hit send.
Meanwhile you’ll notice that shapeshift is showing a blinking Pending Confirmation…, wait a few moments until you see it transition to the next step: Awaiting Exchange.
While on the Awaiting Exchange step, be patient and don’t panic! That step could take anywhere from 15min to a couple of hours. On super rare cases, people wrote that their conversion took 24–48 hours to fully clear. (probably very rare).
If you need to step out and don’t wanna stare at your screen, either copy the page url/link from shapeshift, or bookmark it. (You don’t need to keep the page up and running for the transaction to go through.)
Once you’re on the 3rd step, you should probably have received your coins. Check Rippex and make sure you see your coins there! Grats you did it!! ????
You might wanna save that shapeshift order# or link somewhere, just in case you need to refer to it in the future.
Keep in mind that those trading services take fees, which means that the asset you’re acquiring will most probably be higher than the current market price.
Step 7: What if I want to hold other cryptos, like EOS maybe? Dash?
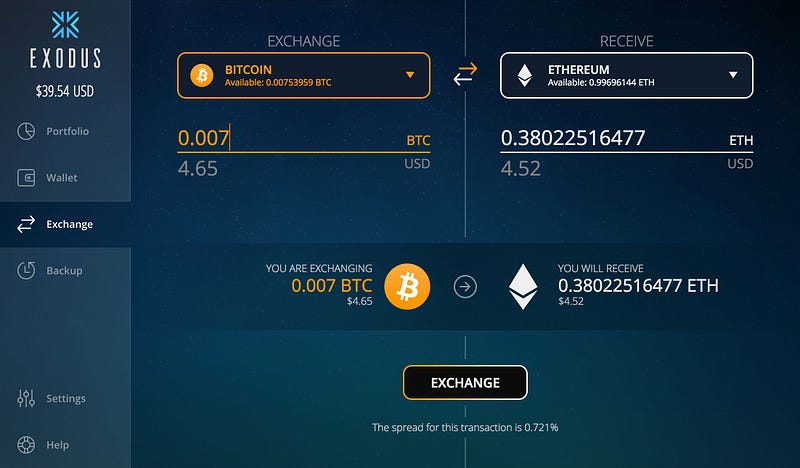
You can either download each individual asset’s wallet, and repeat the steps mentioned above with Rippex, or download a software called Exodus.
Exodus is a local wallet that is user friendly, and more polished than the other local wallets.

Their wallet can support a large number of cryptocurrencies, and they integrated the shapeshift service/api directly into their app. So you can convert from asset to asset right from the app.
Here’s the list of all the currencies they support, along with other upcoming currencies: http://support.exodus.io/article/96-exodus-wallet-roadmap
- If the coin you’re interested in is available on Exodus (looking at the link above), then head over here to download it: https://www.exodus.io/
- You can watch their tutorial on how to set it up: https://vimeo.com/172347797
- It should be pretty straight forward: after installing it, just run it, and it’ll generate wallets for you automatically.
- From here you can click into a wallet like EOS for example, and click on “Receive”. That will show you the QR code and public address, which you can copy and paste into shapeshift.io. Same story as LTC → XRP (refer to Step 6 on how to use shapeshift).
- With Exodus, you also wanna follow the steps to back it up, which will be available/enabled as soon as you deposit any number of coins into it.
- Follow the prompted steps, and write down the 12 words they show you, those words can help you restore your wallet just in case your computer is not accessible anymore, catches fire, or just stops working.
- You can restore all your wallets by entering those 12 words. Watch this video explaining the process a bit: http://support.exodus.io/article/42-how-do-i-restore-from-my-12-word-phrase
- Keep in mind that anyone with those 12 words can fully restore your local Exodus wallet, so they can transfer your coins to their wallet, and p????f!
- If you wanna hold your BTC, ETH, LTC there instead of coinbase, you can. Just transfer them from coinbase/gdax into your Exodus corresponding wallet address.
For your own sanity, I would write down/save my Exodus private wallet keys somewhere, just in case! Head to the Developer menu item, hover over the asset you wanna export, and click Export Private Keys!
Monitoring price changes
Once you start investing, you’d want to monitor price changes, here’s how I do it:
- Either go to coinbase/gdax to see the prices directly for the 3 popular cryptocurrencies.
- Web: https://coinmarketcap.com/
- iOS: HODL and CoinCap.
- Android: HODL and CoinCap
Limit orders (Coming Soon)
I will go over this section at a later time. Stay tuned.
Keeping track of your transactions

I wrote an iOS app that lets you keep track of all your crypto transactions, and syncs them to your private iCloud account. (No servers, which means all your records are accessible to you only!)
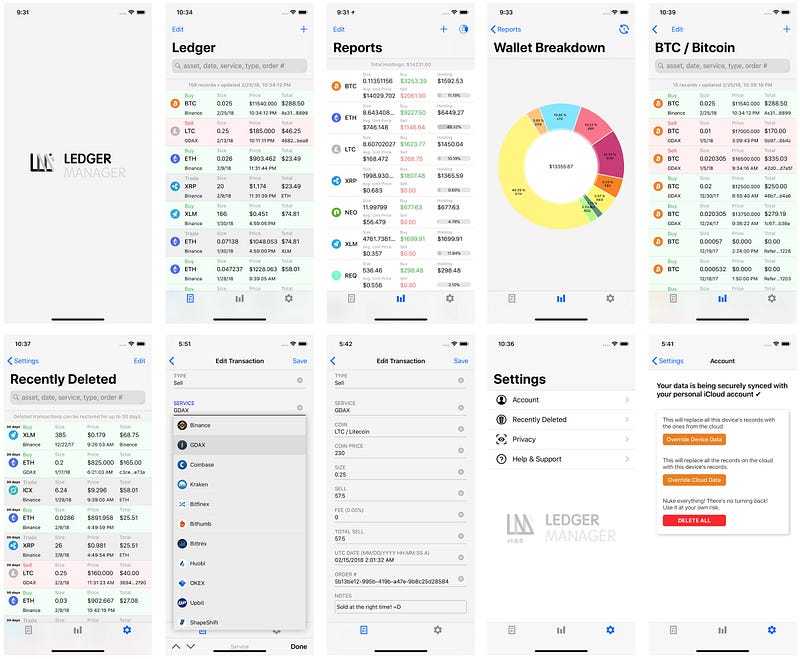
- Record transactions by specifying the exchange, coin/token, price, etc.
- If you bought some currency to exchange it with another one (like Shapeshift, etc.), pick the “Exchange” method, which prompts you to create a subsequent transaction.
- The “Reports” tab ???? shows an aggregated view of the different tokens you’re interested in monitoring. It will auto calculate your average coin price, as you will end up buying currencies with different prices. So knowing your avg. price is ????
- Donut Pie Chart displays your wallet breakdown, by percent, with displaying amounts.
- Deleted transactions end up in a “Recently Deleted” ???? screen to easily restore them if needed.
- Passcode & Biometrics protection. ????
- Above all, it’s completely FREE! ????
- Fore more info visit: http://coconutpeel.com/ledger
Ledger Manager App
Find this helpful?
If you liked this guide then show me some love ????
- My Litecoin (LTC) address: LQYEynz9rPqfJvkk1EK639GWY6ngGCAKSH
- My Ethereum (ETH) address: 0x2a72d1094dD2c2f9b76De44CcEFdc5112917a95c
- My Bitcoin (BTC) address: 1EP2qDjRomikaaHxTAPzM1UAU7JAZWzM8s
If you enjoyed this article, it would really help if you hit recommend and shared it.